Table of Contents
Drivers

The Drivers page is where you can create and manage your company's drivers, review driver's scores, and monitor coaching within your fleet. This guide will detail each of these pages.
Types of Driver ID
Before diving into this feature, it is important to know the forms of driver ID available to drivers on RoscoLive.
Depending on the hardware you have, the following forms of ID are available:
- NFC Card or Tag: This is a physical card or tag that a driver can have on their person. This has a hexadecimal number on it that can be associated to a driver. When this card is scanned, this will identify the driver for that trip.
- Available On: DVXC4 with DR101 NFC scanner
- QR Code: The driver has a QR code that has a hexadecimal number associated with it that can be associated to a driver. The driver will hold this code up to the interior facing camera when beginning a shift and the camera will scan this code and associate that trip to the driver. Either the driver can access this on a physical card, by saving a picture of it on their mobile device, or by using the Rosco Driver App.
- Available On: DV6
At a Glance
This page is where you can add and manage your company drivers.
Adding Drivers
There are two options to adding drivers to your company:
Add a New Driver Button
1. Select Add A New Driver button

2. Enter the following information
- First Name: Driver's first name.
- Last Name: Driver's last name.
- Assign Group: Assign the driver to a company group.
- Email: The driver's email address.
- Card ID: The assigned card ID to the driver. This number can be found on the front of the Rosco driver ID cards. Ex. 09FE5A12.
- Send QR Code: Will send email to driver with QR code for driver ID.
3. The new driver will appear in your list of drivers.

Adding Drivers in Bulk
You are also able to upload drivers in bulk using what is known as a Comma Separated Value(CSV) file. These files can be opened in a notepad but it is easiest to edit them using Microsoft Excel.
1. Select Add A New Driver button
2. Select Upload Drivers

3. Click the Example Driver File link to download an example csv file. You can also use this file as a template for your own drivers.


4. Fill in the relevant information for all of your drivers in the csv file.
- First Name: Driver's first name.
- Last Name: Driver's last name.
- Group: The group in which you would like to associate the driver to. This must be spelled exactly as it is in RoscoLive.
- Card ID: The hexadecimal card ID for the driver.
5. After you are finished adding drivers to the csv file, click “Select a file” and select the csv file from your computer to upload to RoscoLive. The file can be any name as long as it is a csv file.

6. After the file is uploaded, you will now see all of your drivers appear in your driver's list. If you encounter any errors while uploading, be sure to check that your CSV file is formatted correctly, group names are spelled correctly, and the column headers are exactly as they are in the example file.
Managing Drivers
After adding drivers to your fleet, at times you may need to edit information about them, such as if they receive a new driver ID for example.
1. Open the Edit Driver menu by clicking on a driver name.

2. Here you can edit and update the driver's information by selecting one of the text fields and changing the information.

- Driver's first name
- Driver's last name
- Group driver is associated with
- Driver's email address
- Driver ID
After making any changes, select Apply to save those changes.
Other actions that are available are:
- Send QR Code - This will send an email to the driver's email address on file that contains a QR code of their driver ID.
- Delete - This will delete the driver record.
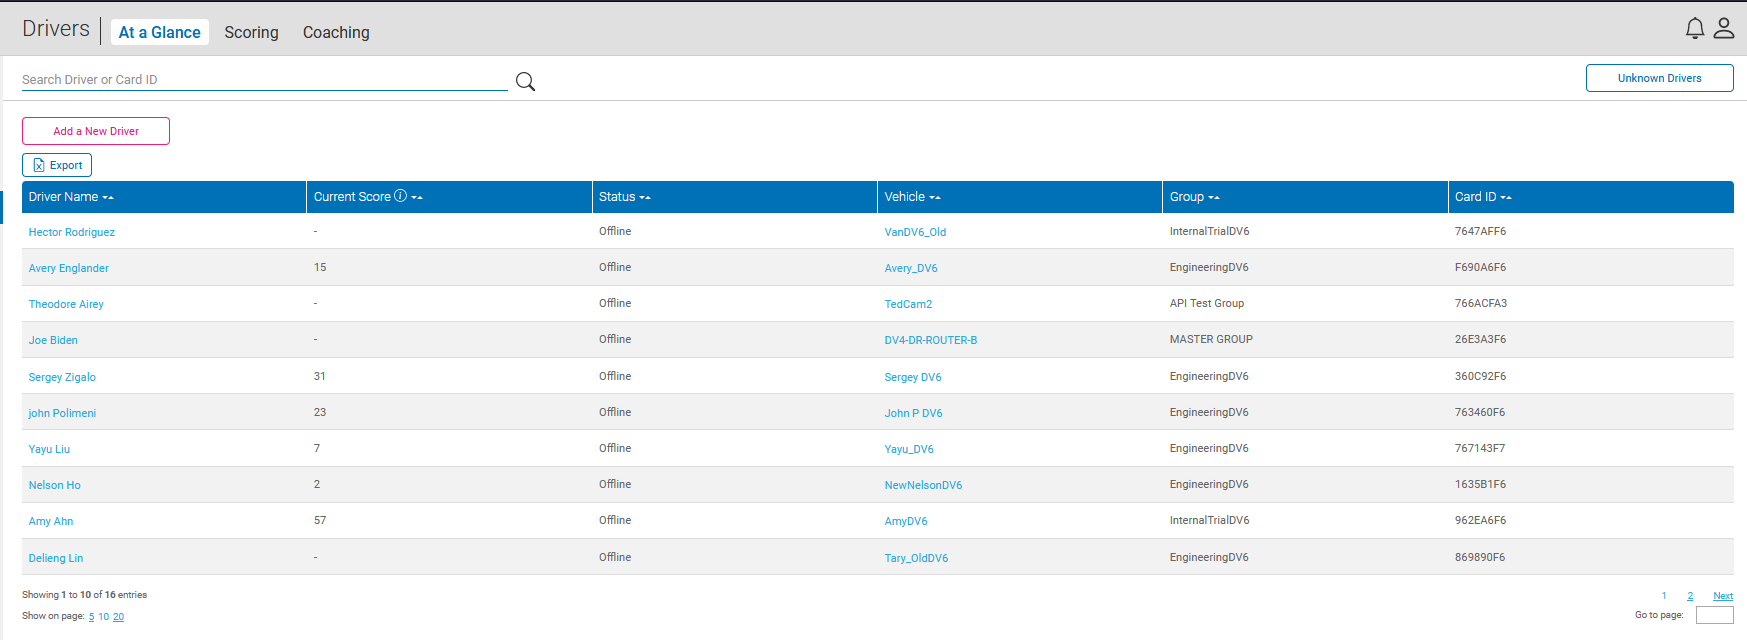
At a Glance
On this page you will see a table of all your drivers with various columns of information. If needed, this table can also be exported in CSV format by clicking the Export button located at the top left of the page.
Current Score

The Current Score column displays the driver's current score for the month. The scoring scale is 0 - 200, with 0 being the best score possible. More about driver scores can be found in the Scoring section of this page.
Status

The Status column informs if the driver is Online or Offline.
Vehicle

The Vehicle column displays the vehicle the driver operated in their latest trip. Clicking the vehicle name will take you to that vehicle's Edit Vehicle page.
Group

The Group column shows the current group the driver is associated with.
Card ID

The Card ID column displays the associated driver ID card number for that driver.
Scoring

The scoring page is where driver performance can be viewed in more detail and adjustment to the event weight score.
How are scores calculated?
The scores are calculated using a simple algorithm:
([(e0 • w0) + (e1 • w1) + …] / m) • c = score
where:
- e = number of events of that type
- w = score weight assigned to that event
- m = miles driven in the given date window
- c = scoring coefficient
For example, a driver has driven 100 miles in the last week and has had 5 distraction events over that course and the distraction event has a weight of 3. The calculation would be:
total distraction score = 5 distraction x 3 weight = 15
(15 / 100 miles) * scoring coefficient = 8
So this driver would have a score of approximately 8 for this time period. Notice there is a scoring coefficient we use to normalize the score to fit the range 0 - 200.
Score Table

The table shows the driver's overall score for the date-range selected. By default, the date-range is the current month to date. This can be adjusted by clicking the date range picker at the top of the page.
Clicking on a driver will open a sub-table where it itemizes the individual events that have contributed to their overall score.


From here you can click on View Event to view the video of the event for that particular score. Both the main table and the itemized event table can be exported into CSV by clicking the Export button.
Adjust Event Weights
By default, all event weights are defaulted to 1. If you would like to adjust the weight settings for an event so that it impacts a score more or less, or perhaps even disregard an event type from the score, click the Adjust Event Weights button at the top right of the page. This will open the Event Weights menu.

To adjust the weight of an event, simply drag the slider to the desired weight. If you wish to disable an event from contributing to a driver score, click the toggle at the top right of the event and you will see it grey out. This means this event type will not contribute to a driver's score.
After making the desired changed, select Apply. The difference in the driver scores will be immediate after changes are applied.
Coaching
The Coaching page is a place where you can see all of the coaching sessions scheduled for your drivers for the time specified.

Types of Coaching
The types of coaching that can be scheduled is Event and Score.
To schedule a coaching session based on an event, select the event in question and in the video player open the Actions menu by clicking the 3 dots at the top right.


To schedule a coaching session based on a driver's score, select the score of the driver you wish to have coached on the Scoring page.


When scheduling a coaching session, the following information can be entered:
- Coaching Event Deadline - This is the date in which the coaching should be completed by.
- Coach Email - The email address of the person who will be providing the coaching.
- Driver Email (optional) - If the driver's email is provided, a copy of the coaching notification will be sent to them.
- Note: Any additional information can be added here.
After entering the information, clicking Create Coaching Event will send out the emails and an entry will appear on the Coaching page.

The following are the possible statuses a coaching event will have:
- Incomplete - The coaching has not been completed yet.
- Complete - The coaching has been completed.
- Overdue - The coaching has not been completed and it is past the due date. In this case a reminder email will be sent to the coach's email.